Navigation Bar

Thursday, March 28, 2013

Pepper Steak

So this recipe to me is a classic.  This was one of my favorite meals my mom would make growing up.  The smell of it cooking still brings me warm and fuzzies.  This is actually a pretty easy recipe to make and a family favorite.  Enjoy!


Here are your ingredients...


To feed a family of 4-6 you'll need about 2 lbs. of round steak, lightly pounded and cut into strips...
Soy sauce, vinegar, brown sugar, red and green bell pepper (my mom uses a tomato instead of a red pepper. You could throw in whatever veggies you want), salt and pepper.  You'll also need water and corn starch.

Go ahead and brown your meat on a medium high skillet and lightly salt and pepper it...


Once the meat is good and browned, add about 3/4 of a cup to 1 cup of water, 5 tbsp. soy sauce, 1 tbsp. vinegar, 1 tbsp. brown sugar...


Let this simmer on low, covered,  for about 45 minutes or until the meat is nice and tender.  Add in your peppers and let simmer for another 15 minutes.


Once your peppers are ready, you'll need to thicken your sauce.  Go ahead and bring up the heat on your pepper steak to about medium.


I use corn starch to thicken this up.  You'll need about a half cup of water.  Stir in about a tbsp. of the corn starch to the water.  Slowly add the mixture to your pepper steak sauce, stirring constantly.  Keep adding the mixture until it is at the desired thickness.  Turn down the heat 'cause you're done!  This is so delicious!  Serve over rice and enjoy!


Pepper Steak
Prep. time: 15-20 min.  Cooking time: about an hour. Feeds 4-6

1-2 lbs top round steak, lightly pounded and cut into strips
3/4 cup water
5 tbsp soy sauce
1 tbsp. vinegar
1 tbsp. brown sugar
1 green bell pepper
1 red bell pepper
1 tbsp. corn starch mixed with 1/2 cup water

Serve over rice.

Brown your meat on medium high to high heat, lightly salt and pepper it.  Once meat is browned, stir in water, soy, vinegar and sugar.  Let simmer on low for about 45 minutes or until it reaches desired tenderness. Add in your peppers that have been washed and sliced.  Let simmer for another 15 minutes.  Once peppers are cooked, increase the heat to medium.  Slowly add corn starch mixture and stir constantly. Once you've reached the desired thickness, reduce heat and serve over rice.
Tuesday, March 26, 2013

~Encouragement for step-moms~ Part 1


When I married my husband not only did I gain a partner for life and a best friend, I also gained the opportunity to be a part of the life of a sweet, beautiful little girl, Melody.  She was three when we met and four when her daddy and I married.  Melody is six now.  Through this time I have been blessed to have a very strong and close relationship with my step-daughter.  With her being so young when we met, I had an advantage that a lot of step-moms don't get.  She has very little memory of me not being in her life.  That has helped maintain a closeness between us.

It was a bit overwhelming at first-  not truly knowing where I stood in her life.  Balancing the emotions of attachment and then separation since the custody is shared.  It was very easy for me to be a mother to her (nurturing her, buying her clothes and shoes and toys, dressing her, feeding her, caring for her when she is sick, etc)  when she was with us, but then have to completely let go of it all when she wasn't.  You get close and then realize...wait...she's not mine.  And that's okay.  That's part of the deal.  The role is full of challenges and struggles and blessings and every situation is unique.  

There were some very choice pieces of advice that were given to me before Austin and I married that really helped me through the process and help me still.  I thought I might share them with you all out there.  


1.  You are NOT her(or his) mom. 

This was hard for me to understand and accept at first.  In so many ways I felt like her mom and wanted to be her mom, but the truth was she had a mom already.  I must respect that and guard my emotions accordingly.  This helps when there are instances when the child naturally wants their mom.  At first, if Melody would ask for her mom, I would get sad, thinking, "I'm right here!"  But, I had to think about how natural it is for her to feel that way and not let it affect my emotions-  and not take it personally. I know she loves me too. :)

2. When the children are at your home, you may not be their mom, but you are THE mom.  

What this means is when your step-child is at home with you, you maintain your motherly role at all times.  That means, you love them like a mom, discipline like a mom, and take care of them like a mom.  There is no favortism or difference in treatment from the step-child to your natural child.  And your authority is always respected and maintained.  This also allows the child to trust you in knowing that you are there for them no matter what the circumstances are. Sometimes this can be an emotional work-out, but it is vitally important. 

3. You and your husband must be united at ALL times.  

In every decision, stance, or value, the two of you must be completely in sync.  This unity must also be displayed on a regular basis in front of the children,  Never open a door that could possibly allow the child to play one parent over the other.  Be sure to communicate EVERYTHING with your spouse in regards to discipline and up-bringing. Even if you don't agree with each other on everything, be careful not to display that in front of the kids.  

More to come...

If I can offer any more encouragement to you in your situation, please let me know.  What are some pieces of advice that helped you adapt to being a step-mom?

Sunday, March 24, 2013

Disney Tips You May Already Know...

This past weekend I took my lovely step-daughter, Melody to The Magic Kingdom and we had a fantastic time!  Having lived in Orlando for seven years, I've been to Disney many, many times, so I've learned a few things that have helped with the over all experience to make it a little bit more pleasant.  So here is my attempt at offering my two cents on how to get the most out of your Disney World experience...Some of this you probably already know but hey- maybe I can give a little insight to someone out there!  Here we go!


1. If at all possible, go in the off season.

Months like January, February, May (right before school lets out for summer), and September, are primo times to go to DW.  It is always crowded...just these times are less tired than others.  If you can avoid going in the heat of summer, by all means do so.

2. Get the Disney World Wait Times app for your smart phone if you can.

This app is great!  You can choose out of the four main parks and it will give you pretty accurate wait times to each attraction.  A must!  So helpful.  There are also great apps that have park maps and other cool Disney World features.

3. Get to your park of choice EARLY.  

And by early, I mean like at the park entrance a good half hour before they open. We arrived at the Magic Kingdom parking lot at about 8:00. We got a great parking spot.  Walked to get our tickets and then took the monorail to the Magic Kingdom gate.  We got there about 8:30.  Park opens at 9:00. There were a lot of people there, but it really wasn't that bad.  Also, about ten til 9:00, they actually did a little welcome show for us that included a count down to opening and a little fireworks! It was great!  Being some of the first people in the park gave us an opportunity to ride a whole lot of rides before lunch time.  It was great!

4. Master the art of the fast pass and time management.

Fast passes are wonderful and if you have the wait time app, you can look up which ride has the longest wait time, get a fast pass for that ride and then go do things with shorter wait times or see a show, eat lunch, meet Tinker Bell, get ice cream, etc. Then ride your ride and then get another fast pass.  Keep in mind you can only get one fast pass at a time.   Fast passes are located at kiosks at each ride entrance. Seems like a pretty obvious concept, but you never know... If you can take a little time to plan things out you can fit in so much more into your Disney day and not have to waste time waiting in line so long. :)

5. Don't rule out EPCOT. 

It seems like this park gets a bad rap from a lot of people before they've even visited.  Oh how mistaken they are! I love all of the Disney World parks, but this one is honestly my favorite.  It is a little bit more of a grown-up park, but there is a lot to with the kids as well.  There are several cool rides (including Soarin' and Test Track), great restaurants, and a lot of fun educational experiences for everyone. It is actually very romantic to stroll around the "World Showcase" especially at night.  Imagine walking around Paris and Italy with your love in the same evening!   The fireworks display is the best out of all the parks, too.  If you can, visit EPCOT during their "Flower and Garden Festival" in the spring or their "Food and Wine Festival" in the fall. Beautiful scenery, food and free concerts from some pretty big names!  We've seen the Beach Boys, Boys II Men, Chubby Checker, The Four Tops, Starship, and so many more!  You can go to the EPCOT website to find out the concert schedule.  If you are a Florida resident you can even get an EPCOT pass that is annual admission any day of the year after 4:00 pm. Last I checked it was around $200.  If you live locally, it is worth the investment, especially during festival seasons.  Christmas time at EPCOT is fabulous, too!

Hope this may help someone out there!  Feel free to ask away if you have any Disney World questions.  I'll do my best to give you a helpful answer!

Glamah Shots with Mindy Kerr Photography!

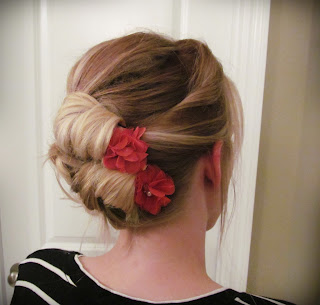
My sister, Mindy, is an amazing photographer!  Last weekend I had the opportunity to join her for a photo shoot to do some hair!  I think it came out purty. My sister does photo shoot packages that include professional hair and makeup. If you live in the central Florida area, check her out here!

Look at this beautiful head of hair!


Wednesday, March 20, 2013

What Should You Tip Your Stylist?

This is a question that will forever be debated...10%? 15%? 20%?


Let me share my thoughts as a stylist who is not currently working in a salon.  I am not writing to boost my tip income.  I'm writing to help explain a stylist's perspective on behalf of all beauty professionals out there. So here we go.  Ultimately, what you tip your stylist is up to you as the client.  You are not legally bound to pay it. I always considered tips from a client were like a special gift that I always appreciated, whether great or small.  But, with that said, your stylist works very hard.  Long hours on his/her feet.  Sometimes going all day without a chance to eat or use the restroom.  Kind of like a server at a restaurant.  Also, if your stylist is an independent contractor, or booth renter, there is a great deal of overhead.  Private health insurance, cost of hair color and product, rent, assistant fees, and many other business expenses. Your stylist will only pocket a percentage of what you are charged for the service. So keep that in mind when you leave your tip.

What's common etiquette to tip your stylist is 15-20%.  If your stylist uses a shampoo assistant, it's customary to leave a dollar or two for him or her.

I was asked if the tip should be more or less depending on the level of detail and difficulty of the service. A light trim as opposed to a total new look. Well, in my humble opinion, that is up to you as the client.  But bear in mind that you're not only paying for the service itself-  you are also paying for the level of trust and confidence in your stylist to do what you want them to do, whether that be a baby trim or an asymmetric bob. That is worth something.  And whether you're getting a little cut off or a lot, the same amount of time is allotted for each service.  A good stylist would (should) put forth the same professionalism,  effort, and skill set in either situation.  Now, if you want to leave a little extra for your stylist for their extra time or input, then by all means!  I just look at it as being a blessing to that stylist.


Sour Cream Chicken

This recipe was given to me by a dear sweet woman, Patti, who was once my boss when I was doing hair in Orlando.  Patti passed the recipe on to me in a cookbook my sister compiled for me as a wedding gift.   Not only is Patti a phenomenal hair stylist, but also a great Italian cook.  This recipe is so simple and delicious.  It's one of my husbands faves- and neither one of us like sour cream, yet this is so good!  The chicken comes out super tender.  Thanks, Patti for the recipe!


Here is what you'll need...

Clean chicken breast, lightly pounded
Pepperidge Farm herb seasoned stuffing
Sour cream (I used light, but you can use whatever you want)
butter

That's it!

Lightly pound out your chicken breast...


Then coat generously with the sour cream...it's okay to get a little messy...


Then coat generously with the herbed stuffing.

Place in a pan coated with cooking spray.

Top each breast with a couple pats of butter.

Bake at 375 degrees for about 20 minutes.  Flip the chicken and put a little more butter on top.  Bake for another 20-25 minutes.  


Enjoy!

Tuesday, March 19, 2013

Polish Picks for Spring!

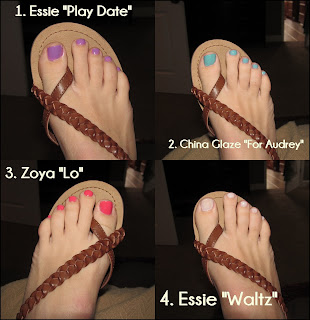
So here is my attempt at photographing my feet...I make no claims to be a photographer, but I thought I'd show you a few of my favorite polish colors for my tootsies.  :) And I found these cute sandals at Tar-shay (Target) just a couple weeks ago.  


Monday, March 18, 2013

Asher's Shelves

Found these crates at the good ole Super Target (a.k.a. the happiest place on earth) while in Orlando.  They were just 3.99 each.  Not too bad!  They make great shelves for Asher's diaper changing stuff.  Right now they are just hung with two large nails each.  I'll have my husband make sure they're really secure later so for now I don't have anything too heavy on them.  What do you think?


Saturday, March 16, 2013

Teasing Tips

Here is a tutorial on how I like to tease my hair.  I hope this helps you on all your teasing endeavors. Enjoy!  And pardon my awkwardness...


Friday, March 15, 2013

Low and to the side loopy do


Here is a new video of a style I wear often.  It's pretty easy, but could take a little practice.  Best when done when hair already has some curl to it.  I often do this when I have "second day" hair and don't feel like washing it. :) I hope this video helps you get those creative juices flowing when putting your hair up.  Have fun with it!


Bedroom decor update

I found these pretty mirrors at TJ Maxx for 16.99 each.  I've seen this look on pinterest and I've been waiting to find the right mirrors to achieve the look and I found them!


Thursday, March 14, 2013

Baby Ball Pit

I can't take credit for this idea and I have no idea who came up with it but BLESS THEM! I found it on Pinterest.  Asher LOVES playing in his ball pit!  He got the balls for his first birthday and it keeps him entertained for quite sometime.  We got them at Wal-mart for $15.  This is one bag and I'm thinking of getting one more to fill it up a little more.  I did notice that after about a month he wasn't quite as excited about it.  I took the balls out for a while and just recently I put them back in his pack n play.  It was like a brand new toy!  If  you have a little one I highly recommend this!

Wednesday, March 13, 2013

THE BEST Chocolate Chip Cookies


These cookies are so simple and delicious. My mom and I make these all the time. The recipe came from her classic Betty Crocker cookbook. I think the newer versions of the cookbook have a slightly different cookie recipe than this. I just love it so much I actually know the recipe by heart. It's fun to play with it a little too. Sometimes I'll add toffee bits and sometimes I'll use butterscotch chips instead of chocolate. A no-fail recipe for sure!

Chocolate Chip Cookies 

 2/3 cup butter (softened)
 2/3 cup shortening
1 cup gran. sugar
1 cup brown sugar (packed)
2 tsp. vanilla
2 eggs
1 tsp. salt
1 tsp. baking soda
3 cups all purpose flour
1 bag milk chocolate chips

 Pre-heat oven to 350. Blend together first six ingredients. Add salt, soda and flour 1 cup at a time. Add choc. chips last. Chill cookie dough for at least an hour. Bake on cookie sheet lined with parchment paper for 10-12 min.


Monday, March 11, 2013

How to Communicate with Your Stylist


We've all had our bad experiences at the salon.  Maybe you tried to explain what you wanted but felt like you're stylist just wasn't getting what you were trying to say. I have found that the main reason for disappointment after a salon appointment is poor communication.  It could be the stylist's lack of understanding and ability to ask the right questions. It could be the client's inability to articulate what they have in mind for their hair.  But, bottom line, it's poor communication.  And there are times when you just simply need to find a new stylist.  Communication is key.  I can admit to times where I have missed the mark with a client's happiness simply because I didn't listen carefully.  Lessons learned.  So through my experience I have had to develop my listening and communication skills.  But I thought I might share a stylist's perspective on how to help a client tell the stylist what they want.


1. Schedule a consultation

    When wanting to do something different with your hair, whether cut or color, or when your starting out for the first time with a new stylist, ask the stylist for a few extra minutes to consult when booking your appointment.  You may even want to book a consultation by itself.  Most stylist will not charge for this (I never did). This will give you an opportunity to feel out your stylist (if it is your first time), while also ensuring plenty of time to make sure the two of you are on the same page.  A separate consultation will also provide the stylist with a little extra time and preparation when you schedule your appointment for a change.  I highly recommend doing this even with your regular stylist when you are wanting to do a dramatic change with your color.  This also allows the stylist to know how to book your color service properly.


2. PICTURES

    I always LOVED when a client brought in pictures of what they were wanting.  You see, when you use words to describe cuts and colors to your stylist, your stylist could interpret those words totally different.  Here's an example..."long layers"...do you mean layers that are long? Or do you mean long hair with lots of layers?  Another, to a stylist, a "reddish brown" could be flaming red to the eyes of the client or vice verse.  Lingo means something a little different to everyone, so pictures help show the stylist what you are desiring.


3. Realistic expectations

    Now when you show your stylist the picture of Catherine Zeta Jones or Jennifer Aniston, please know that these celebrities have stylist following them around constantly making sure ever hair is placed perfectly.  Also, keep in mind the hair type of the person in the picture may not be the same hair type as you.  Hopefully your stylist will be honest with you in how he or she can deliver what you are wanting.  And sometimes certain desired looks may take a series of salon visits to achieve.


I encourage you to not give up on your stylist.  Be willing to give them second chances.  But, if you have tried to communicate properly, have had realistic expectations and still left the salon disappointed, then perhaps it's time to move on.  It doesn't mean that stylist is a bad one, just maybe not the one for you.  

Friday, March 8, 2013

Best Hairsprays

In the world of professional hair care products the options are endless.  Choosing the product for your hair can be overwhelming at times because of the amount of choices!  I have tried so many products in so many different product lines and I have formed my favorites.  What I like may not be what you like so I encourage yo to try out different stuff and form your own opinion.  With that said though, I thought I might share some of my favorites in the hairspray family.  Here is my professional opinion on the performance on not only my own hair, but on my diverse clientele as well.

In no particular order...

1. Kenra Design Spray 9

    This is a very light hold, soft spray that to me is great for spraying on before doing any curling iron work or flat ironing.  It gives the hair just a little bit of control to help you style.  It's what we in the biz refer to as a "working spray". Smells AMAZING too.  I also use this when working with little girl's hair because of how light it is.  Great for fine hair.


2. Paul Mitchell Extra Body Firm Finishing Spray

    Though the label says firm, I found this to be more of a medium hold.  Another great working spray.  Great for using when curling, up-styling, etc.  A great overall spray.


3. Bed Head Masterpiece
   
    Medium to firm hold.  What makes this spray special is that it adds a great shine/sheen to the hair.  I use this a lot as a finishing spray (a spray to use when you are completely finished styling) for up-dos. 


4. Sebastian Re-Shaper

    All around great spray.  Says a firm hold, but again I find it to be more of a medium hold.  I use this as a finishing spray after flat ironing or blow drying.  This spray is soft enough, though to be a working spray when using a curling iron.


5. Paul Mitchell Freeze and Shine

    A hair styling classic.  This is a pump spray with a very firm hold.  Use it for finishing only because it may flake up a bit if you try to work with it.  This is great for shorter textured cuts.  It's nice for some natural curly styles.

6. Big Sexy Hair Spray and Play Harder

    Now this is a firm hold spray.  If you do not want your hair to move at all, this is the one for you.


7. Kenra Design Spray 25

    I saved the best for last!  This is my all-time absolute favorite hairspray.  It's a firm hold without building up. It dries fast. Holds wonderfully. Never flakes. Brushes out if you need it to.  I love this as a finishing spray for volume and hold with out a plastered down look.


Wednesday, March 6, 2013

HAIR COLOR: When to see a professional...

Though I am a professional hairstylist who has made a good living on coloring hair, I am am not so snobbish to criticize or dress down a client who has resorted to drugstore box color when times are tough. I understand that getting your hair colored by a professional is a luxury and when the finances are tough a girl's gotta do what a girl's gotta do when it's time to cover those roots.  But with that said, there are a few instances where I would urge you emphatically to PLEASE SEE A PROFESSIONAL.  Here goes...

~When going lighter~

In the world of hair color there are laws- laws that cannot be broken. Scientific laws actually.  One law- a colorist rule of thumb, is color doesn't lighten colored hair.  If you went to walmart and got a box of color and dyed your hair chessnut brown and then two weeks later decide that you want to be sandy blonde.  SEE A PROFESSIONAL.  The lighter color will do nothing to what has already been colored, while at the same time lightening the new hair growth at the base (root).  Maybe you've experienced this??  So unfortunately, the only thing that can lighten color treated hair is the B word...bleach.  In the hands of a trained professional, this is nothing to fear.  We actually don't like to call it bleach to clients because we know it can sound scary.  We call it "lightener". And professional hair coloring products are so much more gentle and conditioning than others.  A colorist will know how to gently lighten your hair and then tone it to the desired shade of your choice.  A colorist will also be able to assess the condition of your hair and know what your hair can handle. A box can't do that.

~When wanting highlights or dimensional color~

This shouldn't need an explanation. You can pull your hair through a cap. Painful. Messy.  You could comb color through your hair. Risky. Stupid. Messy. 

~When going dramatically darker~

Again, there are laws in the hair color world.  Rules that a box just doesn't understand.  If you have blonde hair and you are wanting to go significantly darker. SEE A PROFESSIONAL.  There is a lot of hair dresser talk I could go into, but I won't go into at this time. Just know if you want rich, vibrant, deep color. Go to a colorist.  Other wise you could end up with flat, ashy "bronde".  Trust.  


Top 5 Products for Blondes

Top Five Products for Blondes

I'm a blonde. Always have been. Always will be.  I like playing around with different shades, but I have decided that blonde is me.  It took some experimenting in beauty school for me to accept it. I had a fellow student turn my hair green in an attempt to be blonder.  In the correction process I was left with dirty, ashy, dish water blonde hair.  Sometime later (after my blonde-ness was restored) I decided it was time for a change- a break up may have had something to do with it. Side note- don't ever make any dramatic changes to your hair post any type of emotional/hormonal trauma.  Just a word to the wise.  Anyway, I went a golden brown. It was a pretty color, just not me. All this to say, I like my blonde hair.

So throughout my years as a blondie and my years as a professional stylist I have compiled a list of some of my favorite products that are great for those with blonde hair.

1.  Blonde Glam color enhancing conditioner in Perfect Platinum, by Redken
      This conditioner is great if you are trying to brighten your hair up a bit.  There are many products out there with a slight violet tint to aid in canceling out yellow tones in the hair.  This one though, adds a very nice condition and moisture.  A great treatment post highlight job.  Smells great, too.


2. It's a 10 Miracle Leave in Treatment for Blondes
    Spray this stuff in your damp hair and style.  It's a great detangler and adds just a little bit of extra condition and protection.  The original It's a 10 leave in is great, too.  This one just has a little bit of a violet tone to help with the dreaded yellowing.


3. Paul Mitchell Super Skinny Serum
   This is a great smoothing serum for anyone, but what makes it great for blondes is how light it is since a pretty good percentage of blondes have finer hair.  Apply it to wet hair and actually helps speed up your drying time.  Apply it to dry, styled hair and it helps to smooth fly-aways without adding any weight.


4. Dirty Secret dry shampoo by Bed Head
     I LOVE this product. I have tried many other brands of similar products but this is by far the best.  It does the job, leaves no residue, and has a light citrus scent.  If you are experiencing a little unwanted "shine" or greasy-ness in your hair, this is the product for you.  We all have used baby powder or corn starch to absorb the oil, which is great in a pinch, but this is an aerosol so it sprays on finely and evenly. Love it!


5. Quick Tease by Redken
    Okay, this product is so cool.  Again, not just for blondes exclusively, but since a lot of blondes I know struggle with flat hair, this product is an awesome volumizer.  It is a finishing spray that adds some grit to your hair to aid in volume.  I like to blowdry my hair smooth and then take some sections in the crown and spray this at the base (roots) underneath.  It gives that extra umpf that we all love.